Showing posts with label quilt. Show all posts

Wednesday, April 17, 2013

SEWN WE CAN DO IT! Sampler Quilt

My mom, Kat, has decided to finally given in to my urging and start quilting. Or, at least give it a try. She had a rough first quilt. Stretchy flannel and intricate piecing. Not a good mix. 

So, we are both doing the Sewn Skill Builder offered by Sewn by Leila. I can use a lot more practice on accuracy as I tend to fly by the seat of my pants and rarely do 'traditional' quilts. So, I'm going to take a contemporary/modern eye to fabric choices to bring the traditional sampler into a more modern aesthetic. I'm by no mean the first to do this...loads of folks have have posted pictures right in this vein. 

I'm also going to be adding in a few Farmer's Wife blocks or other 6" blocks that I just like. I really like the design of a central medallion/star with a round of 6" blocks and round of 12" blocks. Here is the quilt that inspired me for the layout. We will see if, in fact, I can make enough little block to get this to work. 

I'm also going to be borrowing a few blocks from the Summer Sampler Series from Fresh Lemons. I really like the challenge of some of those and don't really intend to do a few of the applique blocks from Sewn by Leila. I've done enough applique to know that it is not for me.

So, here are the primary fabrics I'll be using. I don't know the names of these, so hope I bought enough! I bought about 2 - 2.5 yards of each. I'm adding a few fabrics from my "stash" to add some deeper green and some other tones. 

I've made a few blocks. Clearly, I need more work on the precision portion of this. The meeting points of the HSTs still need more work.

Block 1: Four Patch

Block 2: Log Cabin

Thanks to blog-land, I have now tried three different HST methods. All have pluses and minuses. I won't cover that all here, since others have. But, I have to say there are good and bad parts of each of them.
Block 3 - Churn Dash


Here is what Block 5, Arizona, should not look like. I should not try to piece blocks at 11 pm after very little sleep. I made all the HSTs and then, in a moment of exhausted silliness, cut them all the the finished size. Then, I did not figure that out until it was all too late. And I put the pieces in the wrong places. So, I need to remake this one. I just could not face it yet.

But, here is one of the blocks I made from the Summer Sampler Series. I feel like I may have redeemed myself with this one.Nicely matching points with lots of the right kind of color variation.  

Lucky Pieces, July 27

End

Thursday, January 26, 2012

Leatherback Turtle Art - Susan Carlson's Fabric Confetti

 A while back, I made two wall hangings...brilliantly entitled Turtle 1 and Turtle 2. I used Susan Carlson "Serendipity Quilts" for the technique. Carlson's website is http://www.susancarlson.com/Welcome.html.  Give it a visit to some utterly amazing art quilts.


I found the Leatherback Sea Turtle outline surfing through some free clipart. I simplified the design and added some detail into the carapace (aka shell) to guide my later addition of the fabric.


I used MistyFuse and traced my outline on it. The basic design is simply the sea turtle in a empty field. From there, you use fabric that is shredded into small pieces to make the design. I choose to use two very different colorways on the same image. 


I made the yellow-green one first. I simply used free motion quilting to hold the fused pieces in place. In both, I kept reminding myself to choose the source-point of the light and let that control the design. So, the light is coming from the upper left in each and I added darker fabric right under this version of the turtle to indicate a shadow. This colorway makes me this of warmth and earthyness. This colorway represents the warm marine waters where these turtles spend the nesting season.


The second one (blue-purple) has tulle over parts of it. At the bottom, there are several layers of tulle to simulate the light and dark of water and cut away some from the carapace (aka turtle shell). I really liked the layers of tulle and the texture it added. This is a much cooler ocean for this turtle. The darks are darker and the light are whitish. This colorway represents the cold, deep ocean where this species spends most of the year foraging far and wide (in fact, they are the most wide ranging species of sea turtles). They forage on jellyfish and turn bright red from the nematocycts (painful stingy things), hence, the red-orange body in this version. The little circle around the neck are suggested of those plastic things used to keep soda cans together. All sea creatures are at risk of entanglement and death from those horrible things. 


After completing the centers, I added a border around each (log-cabin style) and then added a backing and some batting (just for the look of it). I used some of my built-in stitches to make the border more textural on the blue-purple. The 'binding' is  three strands of some fuzzy wool yarn with a wide zigzag over it. I cut the yarn to the estimated length for the perimeter of the quilt and then simply held it while I zipped around. I overlapped the two ends and simply zigzaged over them. I ended up going over the yarn twice as I liked the look of the stitches closer together. The thread was the same basic color as the yarn. Finished sizes are around 8x8 or so.


The book by Susan Carlson is very well written with clear diagrams and instructions. She gives a lot of information and does not dwell on the 'how to quilt' basics that seem to be de rigour in the first few chapters of most books. She spends the right amount of time on design and methods. Her work is stunning, especially when you know that she actually draws all her designs in addition to the fabric work.  I used a full-size iron to fuse the fabric to the Mistyfuse. This was a mistake. I would very strongly recommend one of those small crafting irons. Your finger tips will thank you.

I love to try new things and challenge myself with quilting. This was that, so for the process quilter that I am, it was perfect.


While I enjoyed the journey of this, I did not really love keeping track of all the bits of fabric. I ended up with 30 sandwich bags filled with individual fabrics in 'chips.' This seemed to just add to my organization challenges for my very small crafting space. I also had to keep fighting off my cat who kept looking at me like, "oh...how nice, you made all these fluttery play toys for me. Yippee" as she did kamikaze runs across my work table to watch the fabric chips fall to the floor.  


But, I say this was worth it as an artistic push for me and, maybe, others.  


Tomorrow, I'm off to a free motion quilting course at my local quilting store, Wayside Sewing (Marlborough, MA). Lovely owner, great show and great location. This will be my first official lesson in free motion since I took a basic how-to a few years back. From the sample, it looks like there will be some use of chalked on designs. Looking forward to it.


If you want to read more about Leatherbacks Sea Turtles, check out National Geographic's website http://animals.nationalgeographic.com/animals/reptiles/leatherback-sea-turtle/


For information about Leatherback rescue work, check out Leatherback.org
http://www.leatherback.org/pages/rescue.htm

Sunday, January 22, 2012

Secret Baby Quilt

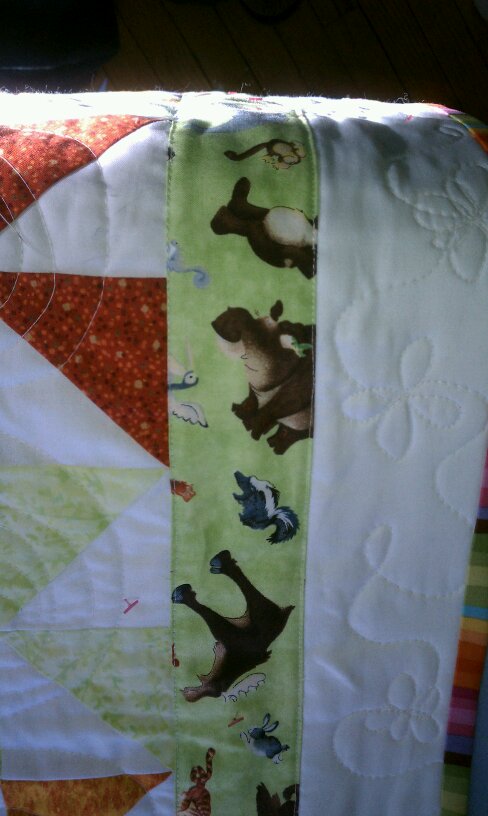
One of my two best friends in the world is having a baby. A little girl if the ultrasound is correct. I found the green animal print when my friend was first pregnant. It is "Rainy Days" by Winky Wheeler Licensed to South Sea Imports. I fell in love and went about designing around this fabric. But, here is the rub. I really care for my friend. And, it seems the more I care for the recipient, the more I struggle with every part of the design. So, knowing this, I decided to use a pattern. I don't normally use patterns, I'm much more a 'follow my muse' sort (thanks for the quote Annie Smith). But, I decided I wanted pinwheels and to make my brain calmer, I bought "Crazy for Baby" by Barbara Groves & Mary Jacobson. I largely followed the pattern of the same name from this book (btw...the book is lovely and shows two color variations for each pattern. Lite on 'how to' but that was fine for me). 


I decided to make the pinwheels from bits of fabric I had. Notice that white fabric? That is from my stash of white 'shirting fabric' bought at a yardsale ($10 for 15 yards). To make the pinwheels, I used the method of cutting two squares and drawing a line down the middle, then sew 1/4 inch on each side of the line. Then, I cut on the line. Hope that makes sense. To piece them together, I used the following video and yielded almost perfect intersections. Woohoo. 
How to Quilt: Piecing a Pinwheel Block


That was the easy part. Then, I had to choose borders. And remove borders. And add borders...and remove them again. Notice the orange border outside the center that overlaps oddly. That's because I appliqued it down because I felt the white border was way too big. I originally used all the decorator fabric to make a scrappy border, but hated that. Remove it. I finally decided to just go with a simple white outer border with a binding made from a fabric I've had forever. 


Then, I quilted it. I hated what I did in the center, but went ahead and finished the rest. I love the rest of it. The pinwheels have spirals and the outer white border has a flower motif. 


Center inspired by Paper and Ink blog, during assembly
A few hours of work later, I loved the outer border quilting but hated the middle. I made it too dense for such a busy fabric. I slept on it and decided to cover it with an applique. So, web surfing I will go (remember...can't draw anything more complex than stick figures). I found a darling paper design by Paper and Ink (Paper and Ink a blog by Jennifer Peebles). If you scroll down to "Birthday Wishes + Free Goodies", you'll see an adorable bear, elephant and bird sign. She used "Paw Pack" font set by Silhouette. Drool...a silhouette. I reorganized the elements into a stack to fit into my space. I think this is much better than the original center with its too busy quilting. 


I have done one other intensive applique project, so knew to pay attention to the 'order' I sew this down to keep the intersections looking nice. All of the sewing around the perimeter was a very narrow zigzag with white Aurafil thread. I then used my trusty Pentel gel pen to add some features. Cute.

The quilt has the binding on (sewn on the back) and I have to finish sewing on the front. Then, remove the Quilt-tacks and, I...think...I'm...done. Now, just to finish planning for her shower in a few weeks. Eek.  


I'll try to post a better picture before I give it to her. 


Saturday, January 21, 2012

A super quick baby quilt

I just finished a super-quick baby quilt for a co-worker. You know the one. You totally ignored the obvious bulge in the tummy until her work baby shower just 1 week away? 


After heading to western Massachusetts for a work meeting and surviving a wind advisory while walking outside for several hours, I felt a treat for me was in order. I searched out a quilt store, typed the address in my Garmin, and I was off. I did not have a lot of time, but I was not disappointed in Southampton Quilts (6 Parc Place #D, Southampton, MA). The store was well stocked with fabrics, but not so tightly that I felt claustrophobic.  And they carried Aurafil in nice, big spools. There was also a lovely classroom in the back.  And they carried Aurafil (I thought it worth mentioning twice).   Well, I found two fabrics to make that long-delayed baby quilt super easy. The Jolly Jungle Labels by the Henley Studio, makower uk (tan) and a striped flannel (I've lost to selvege on this one). I simply quilted along the sides of the little pictures in both direction. I used a creamy colored thread for the top and bobbin. The binding is a bit of deep deal green that  friend gave me from her de-stash.  


I used the QuiltTac to baste the quilt. As I was rushing to remove them, while hearing my son fuss on the baby monitor and knowing my sewing time was at an end, I accidentally snipped the top fabric. The hole was small, but there. At the next nap cycle for my son, I decided I would applique something to cover the hole. Since I am totally unable to draw anything more complex than stick figures, I hit the web. I found a great giraffe appliqued quilt by Oh'Fransson Giraffe Applique (although this applique is no longer available as a pattern, the basic quilt seems to still be available). I think it turned out alright, but maybe a solid color would have stood out more. I wish I could have made it bigger, but I only had 8.5 x 11 paper available and did not feel like piecing together a bunch of pieces for a bigger pattern. 


About 4 hours total time invested...completed over two and 1/2 of my son's naps. 


Co-worker baby quilt. Done. Apologies for the bad lighting and photos. I have a tiny studio and makes taking photos tough.