Showing posts with label quiltack. Show all posts

Monday, January 30, 2012

"Free Motion Madness" Taught by Diane Loomis

If you have never heard of Diane Loomis, I can't recommend finding out about her work enough...and, click to look at her stuff up close. You will be amazed. In her showpiece quilts, some of the free motion designs are pea-sized circles. And they are all perfect circles. I mean OMG!!


Diane Loomis tracing a stencil with fabric marker to demonstrate
doing so without a pounce/chalk option. She explained that we could
use all or only a part of the design. Sorry about the bad lighting Diane!
Diane taught a class at Wayside Sewing. Day 1, we arrived on a Friday night at 6 pm and worked until 10 pm. The bulk of the time was spent on "learning" the basics. The class participants ranged from total novices to old pros. I fell somewhere in the middle skill-wise. Much of the beginning material she covered was pretty standard quilting stuff. But, the details are what set her quilting apart from the typical. She uses wool batting (to keep it poofy), silk 100 weight thread, size 70 sharp needle, and silk-sateen fabric. 


Cathy from the class showing how we
learned to free-motion grid line. Look
ma, no walking foot!
These changes in materials mean that you need to spend a lot of time getting the tension just right and the technique just right. Using only a size 70 needle means you have to really time your hands and material perfectly during free motion or 'plink'...broken needle. I broke 2 before I got in a good timing. The real meat of the class was on Day 2, running from 10 am to 3 pm. In that time, we had to finish our practice piece from Day 1 (or as much as we wanted) and get our 'official' one sandwiched. But, before you sandwich the quilt, you have to mark the top. I just learned this. See, I've never marked a quilt top. I had not idea you could use a stencil and then free motion it. 


So, on my 'official' piece, I choose copper silk sateen with a star that swirled into flowers. The outer area would be a grid.  I used the pouncing method to transfer the designs. Then, pin-basted with teeny, tiny #1 brass pins. I mean tiny.  This was and is my most hated task in quilting. I don't like those little pins. I don't think that you could use the Quiltack either, as the pointy-inserty thingy is probably too large in diameter and the fabric would never recover with the silk blend. 


The real kicker is that this is whole cloth. No piecing. No patterns. No nothing. The entire design is based on what you sew and the difference in density (aka poofiness) between the stitched elements. So, Loomis intensively sews every element. Her method involves sewing over all the marked elements, then echo stitching around each of those. Then, intensively free motion in the unmarked field to get the main design to really pop. She uses a variety of free motion designs within the field to keep the design fresh. Many demos and attempts later, most of the class had a start on the project piece. 


I really enjoyed the class and Loomis as the teacher. I'm not sure that I'll ever complete more than the project piece, but absolutely see how I can apply the method and techniques at a smaller scale. I also loved having like-minded folks in the room asking smart questions that I never thought of. Loomis' teaching presently is focused on the New England area, so look for a class by her if you get the chance.


2/2/12 UPDATE. Added photos from the class.

Friday, January 27, 2012

Quiltack Hints

For Christmas, my dear pal gave me the Quiltack Quilt Basting System. The kit comes with the gun, a replacement needle and a bunch of tacks. The whole thing is easy to use and very well described in the instructions. 

Quilt Basting System Tool, MicroStitch and More by QuilTak
Photo from Quiltack Website at www.quiltack.com
You essentially poke the pointy end through all three layers of your quilt, slide the tip to the side and hit the trigger. If you've done it correctly, you have a nicely inserted  tack to baste. I love this part. It is fast and super easy with a little practice. I basted a twin sized quilt in 5 minutes with much less strain and pain in my hands. I inserted a tag every few inches as instructeds. Previously, I had used the pin-basting method. It is fine. But, I find it time-consuming and I poke myself a lot. 


This system made quilting this quilt a dream. I did not have to stop over few inches to remove a pin. I didn't have to worry about how to get thread our from under the quilting if I thread-basted. 


I thought I'd share a few hints I've discovered. 


1) This system does no eliminate proper prep to baste. Your layers still need to be smooth and tight. I use June Tailor's Quilt Basting Spray when the weather is nice and I can open the double doors to our deck and work on the dining room table.


2) Yes, you really can sew right over the tags. Really. I use a Schmetz Topstitch needle to free-motion and had no issues when I went over a few of them. The thread is Aurafil 50wt (my fav!). 


HOWEVER, be mindful how you sew over them. The top photos shows the stitch dead center in the tack. To get this one out, I had to tension the stitch upward to remove the tack. Depending on what you are making, tensioning the thread may be an issue. 

The second photo shows stitching about 1/3 of the stitch. This worked fine. I was able to easily slip the tack out from beneath the stitch. So, if you can be mindful when stitch, you'll save yourself some stress.


3) I use nail clippers to cut the tacks FROM THE BACK. REPEAT...cut from the BACK. That way if you nick the fabric, you don't have a hole on the front (see Giraffe Baby Quilt). You can also use cat nail trimmers, but I find that the holes in the handles are too small for my fingers. So, the nail trimmers work for me. 


4) The instruction have you insert the tacks on top of your cutting mat. This works and is a good idea. However, if you have standard cutting matts (36x24) you have to do a lot of sliding around to keep this under your quilt. I don't have an easy solution for this one. But, bear this in mind if you use a frame of some sort for basting. 


5) When you remove the tacks, there will be lots on the floor. So, if you have a kid of the age to stick everything in their mouth (or a pet), be prepared to vacuum under your work area right away. That said, at least with a kid, these are small enough and dull enough that I'm not overly worried if my son manages to consume one or two...bad mommy.


6) You will have hole in the fabric after using the Quiltack. I had not problem with this and they totally disappeared after washing. But, if you are making a art quilt and won't (or can't) wash the result, you might do some testing. I think if you inserted the tacks along a seam line, it would be fine -- but I did not test this.


7) Off label use. I was making quick drapes for a friend and the fabric was a bit annoying. So, I used the Quiltack to hold the hem in place. I worked fine for the woven fabric I was using.


8) I used an entire stack/column of tacks for a 40x40" inch quilt (101 x101 cm) about 100 tags. So, if you quilt a lot or do big items, you will use a lot of tacks. But, it is only $17 for a bulk pack of 1600 tags (so that makes them about a penny each or $1 for the tack I used for my quilt)

Sunday, January 22, 2012

Secret Baby Quilt

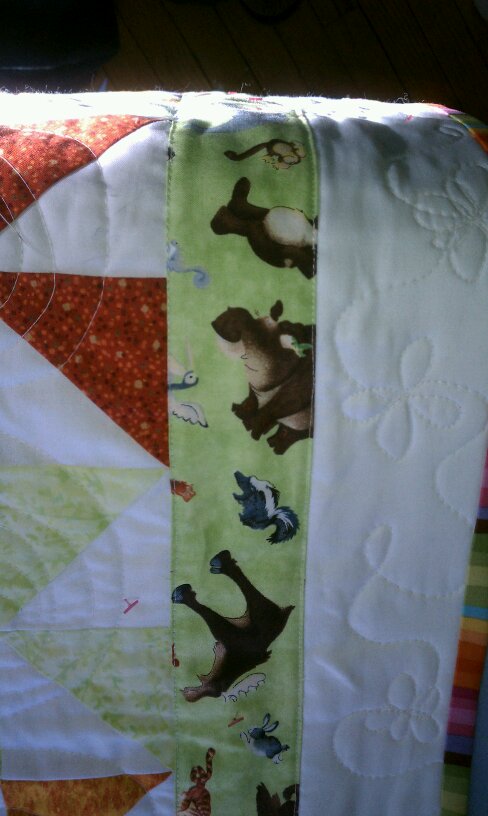
One of my two best friends in the world is having a baby. A little girl if the ultrasound is correct. I found the green animal print when my friend was first pregnant. It is "Rainy Days" by Winky Wheeler Licensed to South Sea Imports. I fell in love and went about designing around this fabric. But, here is the rub. I really care for my friend. And, it seems the more I care for the recipient, the more I struggle with every part of the design. So, knowing this, I decided to use a pattern. I don't normally use patterns, I'm much more a 'follow my muse' sort (thanks for the quote Annie Smith). But, I decided I wanted pinwheels and to make my brain calmer, I bought "Crazy for Baby" by Barbara Groves & Mary Jacobson. I largely followed the pattern of the same name from this book (btw...the book is lovely and shows two color variations for each pattern. Lite on 'how to' but that was fine for me). 


I decided to make the pinwheels from bits of fabric I had. Notice that white fabric? That is from my stash of white 'shirting fabric' bought at a yardsale ($10 for 15 yards). To make the pinwheels, I used the method of cutting two squares and drawing a line down the middle, then sew 1/4 inch on each side of the line. Then, I cut on the line. Hope that makes sense. To piece them together, I used the following video and yielded almost perfect intersections. Woohoo. 
How to Quilt: Piecing a Pinwheel Block


That was the easy part. Then, I had to choose borders. And remove borders. And add borders...and remove them again. Notice the orange border outside the center that overlaps oddly. That's because I appliqued it down because I felt the white border was way too big. I originally used all the decorator fabric to make a scrappy border, but hated that. Remove it. I finally decided to just go with a simple white outer border with a binding made from a fabric I've had forever. 


Then, I quilted it. I hated what I did in the center, but went ahead and finished the rest. I love the rest of it. The pinwheels have spirals and the outer white border has a flower motif. 


Center inspired by Paper and Ink blog, during assembly
A few hours of work later, I loved the outer border quilting but hated the middle. I made it too dense for such a busy fabric. I slept on it and decided to cover it with an applique. So, web surfing I will go (remember...can't draw anything more complex than stick figures). I found a darling paper design by Paper and Ink (Paper and Ink a blog by Jennifer Peebles). If you scroll down to "Birthday Wishes + Free Goodies", you'll see an adorable bear, elephant and bird sign. She used "Paw Pack" font set by Silhouette. Drool...a silhouette. I reorganized the elements into a stack to fit into my space. I think this is much better than the original center with its too busy quilting. 


I have done one other intensive applique project, so knew to pay attention to the 'order' I sew this down to keep the intersections looking nice. All of the sewing around the perimeter was a very narrow zigzag with white Aurafil thread. I then used my trusty Pentel gel pen to add some features. Cute.

The quilt has the binding on (sewn on the back) and I have to finish sewing on the front. Then, remove the Quilt-tacks and, I...think...I'm...done. Now, just to finish planning for her shower in a few weeks. Eek.  


I'll try to post a better picture before I give it to her.